There are a lot of ways to setup a REST API on AWS. This starter project will save you time. You can have an easy to customize REST API setup on AWS using TypeScript in 5 minutes using only AWS services.
The complete source for the service you’ll be setting up can be found on GitHub: aws-sam-rest-api-starter. This starter project creates a simple CRUD service for a database table called BLOG_POST. Once deployed, the following REST API will be exposed:
- POST /blogposts – creates a new BLOG_POST record from the JSON body
- GET /blogposts – retrieve all BLOG_POST records
- GET /blogposts/:id – retrieve the BLOG_POST with the given ID
- PUT /blogposts/:id – updates an existing BLOG_POST record by ID from the JSON body
- DELETE /blogposts/:id – removes the BLOG_POST record with the given ID
The REST API that’s generated by the starter project can be represented in AWS by the following diagram:
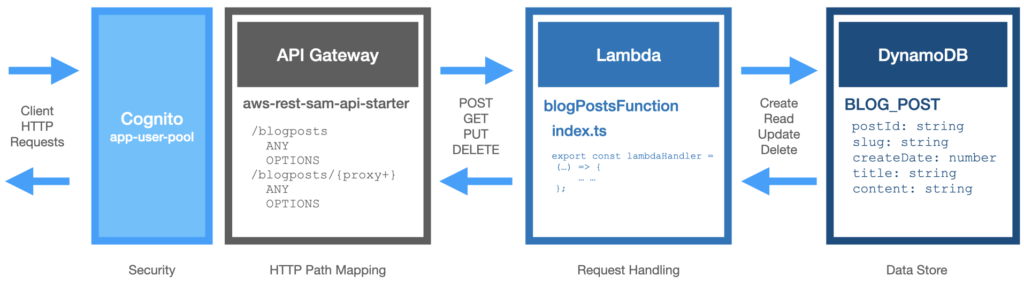
The starter project is easy to modify to suit your own needs. Here’s a quick summary of what the starter project provides:
- Standardized-project structure
- Lambda function coded in TypeScript
- NoSQL database access using DynamoDB
- HTTP service methods exposed securely through API Gateway
- Authentication with Cognito and custom Authorization
- Pre-defined IAM access roles
- Fully automated deployment using AWS SAM and CloudFormation
If you would like an introduction to AWS and the technologies used in this guide, keep reading. If you just want to get a REST API using TypeScript setup as quickly as possible, jump down to Before you Get Started.
Introduction
AWS led the way with serverless computing. As competition has increased the AWS platform has had to evolve, adding service offerings and changing recommendations. This has led to a lot of conflicting information online and out-of-date tutorials. It has also led to a wide array of technology choices that can be difficult to wade through.
This guide focuses on getting a REST API setup quickly by combining the following AWS service offerings:
- Lambda: the AWS serverless computing service that allows you to run code without managing servers.
- DynamoDB: an easy-to-manage NoSQL database service for AWS.
- API Gateway: the AWS service that allows you to create, maintain, and secure APIs.
- Cognito: the AWS identity and access management platform.
- CloudFormation: the AWS infrastructure as code (IAC) service for automating your code deployments.
- AWS SAM: the AWS Serverless Application Model (AWS SAM) makes it easy to quickly build serverless applications on AWS.
This combination of offerings is what we generally recommend to a startup looking to expose services through a cloud platform. They provide a low cost of entry and rapid development while providing significant flexibility as your product evolves.
The project uses AWS SAM to fully automate the deployment of the REST API. All infrastructure requirements and deployment specifics are setup through its IaC (infrastructure as code) model. If you are new to DevOps and deployment automation or would just like a refresher, you can learn more here.
Before you Get Started
First things first, you will need an AWS account. If you don’t have one, you can sign up for one here. You will also need a deployment profile locally. This profile allows you to perform operations on AWS from the command line interface (CLI). If you haven’t created one, you can follow these instructions to get there.
If you already have an account and you would like to create a development environment specifically for this tutorial, you can follow this guide. This guide will also show you how to create a development, testing, and production environment so you can safely transition your software through testing and into production.
Installing the Basics
Once you have your target AWS environment ready, you will need to setup your local development environment:
Later in the tutorial we will install a few development-oriented specifics, but here we’re just focused on getting the REST API up-and-running.
Setting up the Project
Once you have installed the necessary prerequisites you can setup the project with the following commands:
$ mkdir <project-directory>
$ cd <project-directory>
$ sam init --location git@github.com:jorshali/aws-sam-rest-api-starter.git
The starter project will now be available in the project directory you specified.
Building the Project
Make sure you have selected the profile you want to deploy to. All artifacts will be created in this account. For example, on a Mac:
$ export AWS_PROFILE=<my-deployment-profile>Build the environment with AWS SAM:
sam build --beta-featuresNote: The beta-features flag is necessary since we are using TypeScript.
Deploying the Project to AWS
You can now deploy to your environment using the profile you selected:
sam deploy --guidedWhile being guided through the deployment, the defaults are recommended except for the Stack Name. You can customize the Stack Name to something specific to your project.
Once the deployment completes, it will print out 3 results:
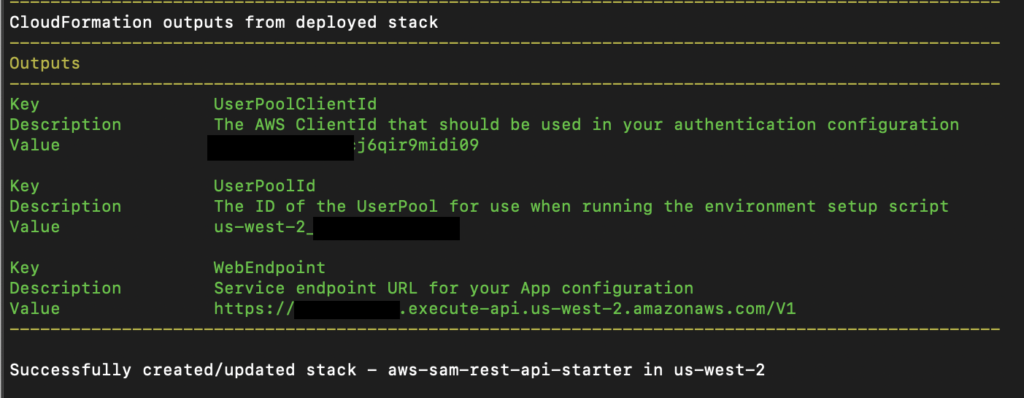
Hang onto these values as you will need them for the data setup and your calling application.
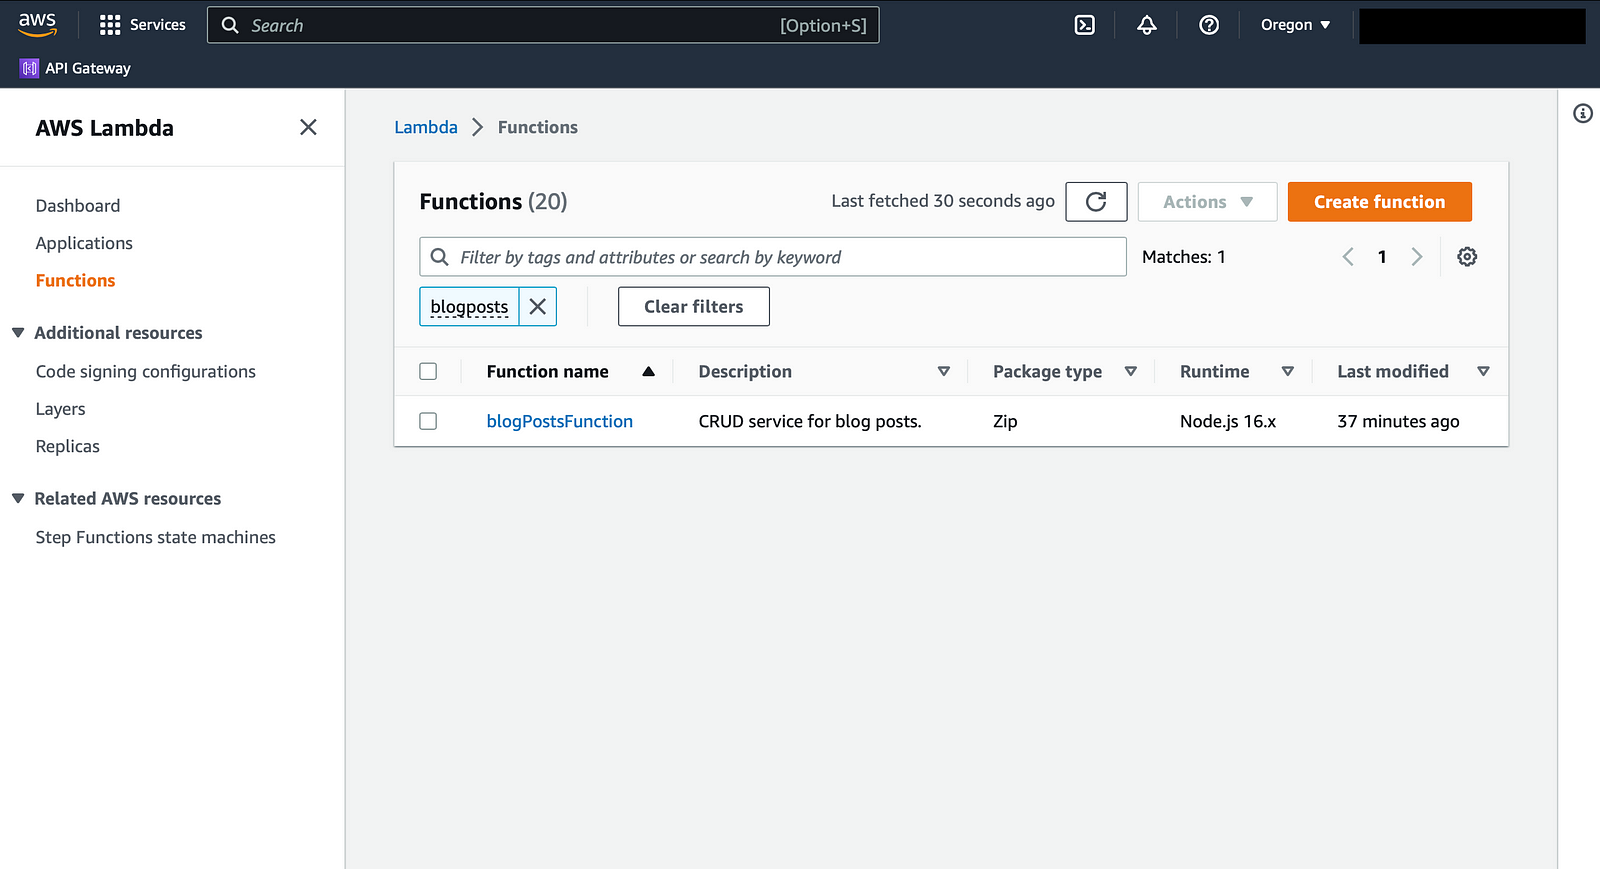
You can now login and browse your AWS Console to see the various components that were installed. For example, you will find the blogPostsFunction within the Lambda console.
Setting up Sample Data
There are several included scripts for setting up the environment with default data for initial testing. These commands will ask for some information provided by the project build.
In the project directory, simply run the following command:
$ sh scripts/setup.shOnce the data has been setup, you likely want to add a user. This can be done with the following command:
$ sh scripts/add-user.shNote: If you are unable to run the scripts in your environment, you can execute the CLI commands within the scripts manually.
Running the Service Locally
You can test your service locally using Docker. You can install Docker here. Once Docker is installed, you can start the project locally with the following commands:
$ sam build
$ sam local start-api
Project Organization
This guide is purely focused on getting a REST API service up-and-running on AWS quickly. In an upcoming series, I will walk you through more project specifics.
If you want to get started customizing the project right away, here’s a quick rundown of the project structure. You can browse this code from the project root in VS Code:
- template.yml: the CloudFormation template that defines the service requirements. If you want to customize the REST API URL, DynamoDB table definitions, etc, this is the place to do it.
- blogposts: contains the code for the blogposts function. This is where you will find the package.json dependency definitions, TypeScript files, and general configuration.
- blogposts/index.ts: the TypeScript function that handles all /blogposts requests. You can use this as a base for your own service or experiment with your own functionality.
If you want to setup a UI that calls on your new REST API, you can clone the supporting project: aws-react-bootstrap-starter. This project will login using the Cognito APIs and then call on your REST API.
Subscribe to get notified when my next installment is released!